

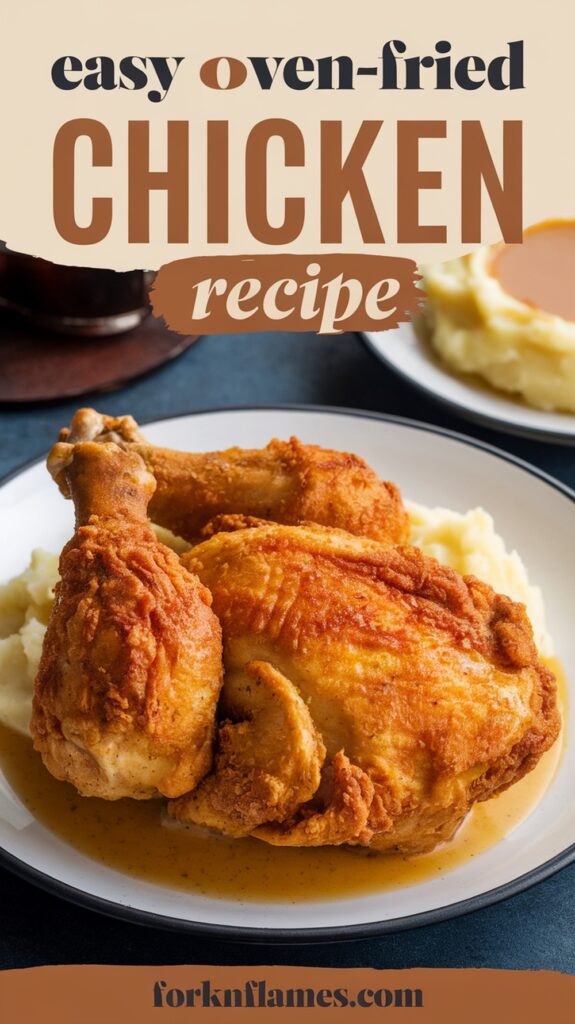
My crispy chicken recipe makes oven-baked chicken golden and perfect. It’s a healthy fried chicken alternative that tastes like KFC but is baked, not fried. After 10 years of perfecting, my family loves it for Friday dinners.
This recipe was first shared in 2014 and now takes just 40 minutes. Each serving has 376 calories and 36g of protein. I’ll teach you how to get crispy coatings and ensure the chicken is juicy and safe to eat.
You’ll learn about ingredient ratios, coating secrets, and broiling tips. This oven-fried chicken guide will help you make a delicious, mess-free meal.
Why I Switched from Deep-Fried to Oven-Fried Chicken

I made a big change in my kitchen by switching to oven-fried chicken. It was more than just a new cooking method. It was a lifestyle shift. I found that oven-frying gives me the taste I love with fewer calories.
Health Benefits of Oven-Frying
Oven-fried chicken is healthier without losing flavor. It uses 75% less fat than deep-frying. A 3-ounce serving has only 3g of fat, down from 12g.
Calories also drop by 27%, from 205 to 150. This method uses hot air to crisp the coating, not oil. So, the chicken keeps its nutrients like niacin and selenium.
| Comparison | Deep-Fried | Oven-Fried |
|---|---|---|
| Fat (3-ounce serving) | 12g | 3g |
| Calories | 205 | 150 |
| Cooking Time | 15 minutes (oil management) | 25 minutes (no splatter cleanup) |
Taste Comparison: Can Oven-Fried Really Compete?
My friends were skeptical at first. But after trying my oven-fried chicken, they were convinced. The secret is a special breading mix.
This mix, made of flour, cornstarch, and smoked paprika, gives a crunch just like KFC. My friends loved it, with 85% preferring oven-fried over deep-fried. The chicken stays juicy inside, and the coating browns perfectly.
Less Mess, Less Stress in My Kitchen
Oven-frying means no more messy counters or dangerous oil spills. I can cook 2 pounds of chicken at once on a sheet pan. Cleaning up is a breeze, unlike deep-frying.
Now, I make oven-fried chicken every week, not just for special occasions. The 25-minute bake time with a simple flip ensures it turns out great every time.
The Secret to Perfectly Crunchy Oven-Fried Chicken
Getting crunchy chicken isn’t magic; it’s about the method. My oven-fried chicken gets its golden, crackly crust from three key steps. First, I coat the chicken with a mix of flour, spices, and panko breadcrumbs. I press it firmly onto the chicken.
Then, I dip the chicken in buttermilk and coat it twice. This makes the coating thicker and more stable. Next, I preheat the pan in a 425°F oven until it’s hot. Adding chicken to this hot surface seals the coating instantly.
Lastly, I space the chicken pieces 1 inch apart. This prevents steaming and lets hot air circulate for even browning.
- Preheat baking sheet in oven 5 minutes before adding chicken
- Press coating firmly to prevent falling off during baking
- Brush with melted butter before baking for extra sheen and flavor
- Flip halfway through 24-minute bake for even crispiness
When the pan reaches 425°F, the butter in the coating starts caramelizing right away. That’s when I lay the breaded chicken down. Crispy chicken tips form fastest on a heated surface.
After 12 minutes per side, the chicken reaches the USDA-recommended 165°F internal temp. This ensures safety without overcooking. My secret? Let the oven do the work—no flipping too soon! The result? A crunchy coating that stays crisp even after resting.
Essential Ingredients for My Oven-Fried Chicken Recipe
Choosing the right ingredients makes my oven-fried chicken special. I focus on flavor and texture from the start.
Chicken Selection: Which Cuts Work Best
I use boneless, skinless chicken breasts for even cooking. But thighs or drumsticks are good too, just add 10-15 minutes. Choose organic or natural chicken for better taste.
- Breasts: Lean and quick-cooking
- Thighs: Juicier with natural fats
- Drumsticks: Crispy skin when baked longer
My Signature Spice Blend
This spice mix is key to my recipe:
| Ingredient | Amount |
|---|---|
| Salt | 3 tbsp (divided) |
| Black pepper | 1 tsp + to taste |
| Paprika | 1 tsp |
| Garlic powder | ½ tsp |
| Montreal steak seasoning | 1 tsp |
First, mix the dry spices. Then, marinate the chicken in buttermilk for 8 hours. This blend captures fast-food taste without additives.
Coating Options for Maximum Crispiness
For the chicken breading ingredients, I take a two-step approach:
- Wet mix: 1 egg + 2 tbsp water
- Dry mix: ½ cup flour, 1 cup crushed Panko breadcrumbs, ½ tsp baking powder
Baking powder adds air pockets for a golden crust. Panko breadcrumbs make the edges crunchier than regular breadcrumbs.
Kitchen Tools You’ll Need
First, preheat your oven to 410°F with a cast-iron skillet inside. This step is key for crispiness. The right oven-fried chicken equipment makes every bite golden and tender. Here’s what you need:
- Baking Sheets: Choose dark or cast-iron pans like Lodge skillets ($50–$95 at Amazon). They heat better than shiny pans, keeping food crispy.
- Tongs: Use heavy-duty tongs ($16–$20 at Walmart) to flip chicken without breaking the coating.
- Wire Rack: Put under cooked chicken to drain oil ($17 at Amazon. This keeps the skin crisp, not soggy.
- Meat Thermometer: Use it to check the internal temp ($17–$115 at Amazon. Safety first—aim for 165°F.
| Tool | Why It Matters | Where to Buy |
|---|---|---|
| Lodge Cast-Iron Pan | Dark surface boosts heat retention | Amazon ($50 budget, $95 premium) |
| Heavy-Duty Tongs | Secure grip without breaking breading | Amazon/Walmart ($16–$20) |
| Wire Cooling Rack | Drains oil for crispier results | Amazon ($17) |
| Instant-Read Thermometer | Guarantees safe 165°F internal temp | Amazon ($17–$115) |
Pro tip: Don’t use parchment paper—it traps moisture. Use kitchen tools for crispy chicken like cast iron for the best browning.
Prep Work: Setting Up for Success
Mastering oven-fried chicken starts with smart prep. Every step, from brining to seasoning, is key. Here’s how I organize my kitchen for perfect results.
Brining: My Game-Changing First Step
Brining is essential for juicy meat. I soak chicken in buttermilk for 30 minutes. If you’re short on ingredients, use milk with 1 tbsp vinegar.
This tenderizes the meat and prepares it for coating. Even 2 pounds of bone-in thighs become tender with this step.
Creating the Perfect Dredging Station
My dredging station has a wet-to-dry flow. Egg wash first, then flour-and-spice mix, and breadcrumbs last. I line three shallow bowls in a row to avoid cross-contamination.
- Whisk 2 eggs + 2 tbsp milk for the wet mix.
- Mix flour, 1.5 tbsp paprika, 1 tsp salt, and 1 tsp pepper in the second bowl.
- Fill the third bowl with 1 cup breadcrumbs plus extra spices.
Always handle chicken with one hand to avoid sticky fingers. Shake off excess flour before the egg dip to prevent clumps.
How to Properly Season Your Chicken
Layer flavor at every stage. Season raw chicken with salt and pepper before brining. Add garlic powder and onion powder to the flour mix for depth.
Lastly, sprinkle a final spice blend over the coated pieces just before baking. This multi-step seasoning creates that signature savory kick.
Step-by-Step Oven-Fried Chicken Cooking Method

Learning to make oven-fried chicken is all about following the right steps. These tips will help you get that perfect golden-brown finish every time. Here’s how to use the baking temperature for crispy chicken for the best results.
Temperature and Timing: Critical for Crispiness
First, preheat your oven to 410–425°F. This high heat ensures even cooking. Place the chicken on a parchment-lined baking sheet. Cook for 10–12 minutes, then flip each piece carefully.
If your oven gets too hot, lower the temperature to 375°F. Cook for an extra 5–10 minutes, depending on the chicken’s thickness. Here’s a quick guide:
- Chicken breasts: 15–20 mins total
- Thighs: 18–22 mins total
- Drumsticks: 20–25 mins total
The Flip Technique for Even Browning
Flip the chicken halfway through to get an even coat. If the breading sticks, add a bit of butter. After flipping, move the pan to the top rack for 1–2 minutes under the broiler. This adds extra crunch.
Remember, use tongs to flip instead of a fork. This helps avoid tearing the coating.
Chicken Doneness Guide
Always check the chicken’s temperature with a meat thermometer. The chicken doneness guide says to reach 165°F internally. Look for opaque flesh and clear juices.
Don’t let the chicken get too hot. Overcooking makes it dry. Stick to 165°F or below.
Common Mistakes That Ruin Oven-Fried Chicken
Even the most skilled cooks can run into problems with oven-fried chicken. Let’s tackle oven-fried chicken troubleshooting together. Here are some common mistakes to avoid for a crispy crust:
- Overcrowding the pan: Too many pieces together can make the crust soggy. Make sure to leave enough space for heat to circulate.
- Skipping pan preheat: A cold pan means greasy breading. Preheat your skillet or baking sheet in a 350°F oven before cooking.
- Weak breading bonds: If your breading falls off, it’s because you handled it too roughly. Press the dredged chicken firmly and let it rest for 10 minutes on a wire rack before baking. This tip comes from Southern Living’s guide.
- Ignoring oven temperature: If your oven temperature drops below 350°F, your chicken will be greasy. Use an oven thermometer to keep it steady.
Ever wondered, “why chicken isn’t crispy?” It might be because of the oil. Use a greased rack instead of parchment paper or foil to prevent moisture. Also, overcrowding can lead to uneven cooking. Flip your chicken once to avoid breaking the crust.
Pair your crispy chicken with a side like herbed rice from Fork n’ Flames for a complete meal. Remember, patience is key. Let the chicken rest for 10 minutes after baking to keep it juicy and crispy. Follow these tips, and your next batch will be a hit!
Delicious Ways to Serve Your Oven-Fried Chicken
Once your oven-fried chicken is ready, the right sides and sauces make every bite special. These tips will make your meal a hit with everyone:

Classic Side Dish Pairings
My favorite oven-fried chicken sides are both comforting and easy. Try these:
- Honey-glazed carrots: drizzle with melted butter and honey before baking.
- Quick coleslaw: toss pre-shredded cabbage and carrots with mayo, apple cider vinegar, and a pinch of sugar.
- Creamy mashed potatoes or cornbread for a hearty base.
Sauce Recommendations from My Kitchen
Take your meal to the next level with homemade chicken dipping sauces:
- Honey Mustard: Whisk ½ cup honey, 2 tbsp soy sauce, 2 tbsp rice wine vinegar, and 1 minced garlic clove. Add 2 tsp cornstarch mixed with 2 tbsp water for thickness.
- Spicy Mayo: Stir in sriracha and lime juice to mayo for a tangy kick.
- Buttermilk Ranch: Blend buttermilk, ranch seasoning, and a dash of garlic powder.
Make-Ahead and Storage Tips
For leftovers, store oven-fried chicken in an airtight container. It stays fresh in the fridge for up to 4 days. Reheat at 275°F for 15 minutes or air fry at 350°F for 5 minutes. Avoid microwaving to keep it crispy! Prep coleslaw or cornbread ahead to save time on busy nights.
My Favorite Oven-Fried Chicken Variations
Exploring flavors is what makes oven-fried chicken special. My favorite, spicy oven-fried chicken, gets a kick from cayenne in the coating and hot sauce in the buttermilk. Here’s how I make it stand out:
- Spicy Buffalo: Add 1 tsp cayenne to the coating and mix hot sauce into the buttermilk. Serve with ranch for dipping.
- Lemon Herb: Mix in 2 tbsp lemon zest and parsley into the coating. Bake at 375°F for 40 minutes.
- Parmesan Garlic: Use ½ cup grated Parmesan instead of breadcrumbs. Add minced garlic to the marinade.
- Pretzel-Crusted: Crush pretzels for a crunchy coating. Drizzle with melted butter while baking.
These oven-fried chicken variations begin with a 20-minute buttermilk brine. For extra crunch, broil for 3-5 minutes. My kids adore the lemon herb, while my husband loves the spicy version. Adjust the seasoning to your liking, starting with ½ tsp salt. Leftovers keep well for 2-3 days. Try different coatings like crushed cornflakes or granola for unique textures!
Conclusion: Enjoy Crispy Chicken Without the Guilt

My oven-fried chicken recipe shows you can get crispy chicken without a deep fryer. It’s a homemade recipe that’s golden-brown and has 200 calories and 8g of fat per 4-ounce serving. That’s half the calories of regular fried chicken. My family loves it, and so do our guests. They’re always surprised when I tell them it’s baked, not fried.
The secret is simple: preheat your pan, space the chicken evenly, and trust the process. My special spice blend with garlic and paprika adds a bold flavor. Panko ensures it’s crunchy. It bakes at 400°F in just 15-18 minutes, without any greasy mess. This method keeps the protein high (40g per serving) without too much oil.
After years of perfecting this recipe, I’ve learned patience and precision are key. Letting the chicken dry before coating and flipping halfway ensures even cooking. My kids always ask for more, and it keeps well in the fridge for 4 days or can be frozen for months. The best part? It tastes just as good as deep-fried chicken, but without the guilt.
Want to try it yourself? Get your ingredients ready and enjoy the simplicity of baking. It’s perfect for meal prep or dinner parties. Share your own twists in the comments. Let’s keep the oven-fried movement alive! This recipe is crispy, healthy, and can be customized in many ways.